Preparation of Greek Kourabiedes: My Festive Baking Adventure.

Preparation of Greek Kourabiedes
As we approach the festive season, our thoughts turn to baking those special treats that fill our homes with warmth and nostalgia. Kourabiedes, the beloved Greek Christmas cookies, hold a dear place in our hearts. These buttery, almond-studded biscuits dusted with powdered sugar are a must-have on our holiday platters.
Family recipes for kourabiedes has been passed down through generations, each batch carrying the love and traditions of those who came before us. We’ve found that using room temperature butter and toasting the almonds beforehand results in the most melt-in-your-mouth texture. The sweet aroma of these baking is enough to transport us back to Christmases past, gathered around the kitchen table with loved ones.
While we often make kourabiedes for Christmas, they’re also lovely for Easter, weddings, or any time we fancy a taste of Greece. We love to shape them into crescents or little balls, always with a whole clove pressed into the centre for a touch of spice. Once baked, we pile them high with icing sugar, creating little snowballs that are almost too pretty to eat – almost!
Historical Significance

Kourabiedes hold a special place in Greek holiday traditions. These buttery almond biscuits connect Greeks to their cultural heritage and bring families together during festive times.
Relation to Greek Festivities
The Greeks love their Kourabiedes at Christmas. They’re a must-have treat, along with Vasilopita, our New Year’s cake. Many of them have fond memories of helping their mums or yiayias make these sweets. The powdery white cookies remind them of snow, even though it’s rare in Greece!
Weddings and baptisms also feature Kourabiedes. They often give them as favours to guests. The biscuits’ sweet taste symbolises the joy of these special occasions. It’s lovely to see how a simple recipe can mean so much to them.
Kourabiedes vs Melomakarona
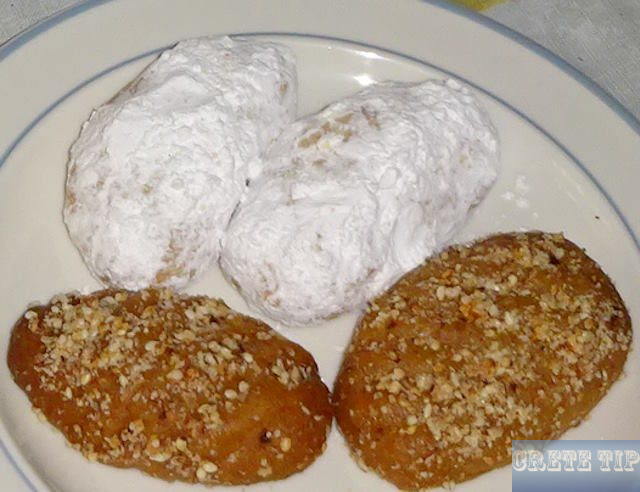
We can’t talk about Kourabiedes without mentioning Melomakarona. These two sweets are like the yin and yang of Greek Christmas treats. Kourabiedes are buttery and coated in icing sugar. Melomakarona are honey-soaked and sprinkled with nuts.
Most Greek homes have both during the holidays. Some of them prefer the richness of Kourabiedes, while others love the spicy notes in Melomakarona. It’s not uncommon to see friendly debates about which is better! Both recipes have been passed down through generations, making them equally dear to their hearts.
Essential Ingredients
Kourabiedes are all about simple, high-quality ingredients. We’ve found that using the best butter, flour, and almonds makes a huge difference in the final taste and texture of these biscuits.
Choosing the Right Butter
Butter is the star of kourabiedes. We love using unsalted butter for better control over the sweetness. Sheep butter gives a rich, tangy flavour that’s traditional in some parts of Greece. For the best results, we let the butter soften at room temperature before mixing. This helps create that melt-in-your-mouth texture we all crave.
If you’re after vegan kourabiedes, coconut oil or vegan butter can work. They won’t taste exactly the same, but they’ll still be yummy. Just make sure to chill the dough a bit longer before shaping.
Flour Varieties and Substitutes
All-purpose flour is our go-to for kourabiedes. It gives the biscuits a nice, tender crumb. We sift it to remove any lumps and make the dough smoother.
For gluten-free kourabiedes, we’ve had good luck with a mix of rice flour and almond flour. It’s not quite the same, but it’s pretty close. You might need to add a bit of xanthan gum to help bind everything together.
Almonds and Their Alternatives
Toasted almonds add a lovely crunch and nutty flavour to kourabiedes. We chop them roughly – not too fine, not too big. Toasting brings out their flavour, so don’t skip this step!
If you can’t have almonds, try walnuts or pecans. They’re both tasty options. For nut-free biscuits, leave them out entirely or use some toasted oats for a bit of texture.
Preparing the Dough
Making the dough for kourabiedes is a fun and rewarding process. We’ll mix the ingredients carefully and let the dough rest to get the best texture.
Mixing Technique
We start by creaming butter until it’s light and fluffy. This takes about 5 minutes with an electric mixer. Then we add icing sugar and beat for 2 more minutes. Next, we crack in an egg yolk and a splash of vanilla extract. Some recipes call for almond flavour too – it’s up to you!
Now for the dry ingredients. We sift flour and baking powder together, then fold them gently into our butter mixture. If you’ve got a food processor, it can make this step a breeze. Just pulse until the dough comes together.
Lastly, we mix in chopped almonds. Be gentle here – we don’t want to overwork the dough.
Resting and Chilling
Once our dough is mixed, we wrap it in cling film and pop it in the fridge for at least an hour. This chilling time is crucial – it lets the flour absorb moisture and the butter firm up.
While we wait, we can prep our baking trays. A quick lining with parchment paper does the trick.
After chilling, our dough will be easier to handle. We take it out of the fridge about 15 minutes before shaping to let it soften slightly. This makes it easier to roll into balls or crescents.
Remember, cold dough bakes better. If it gets too warm while we’re shaping, we just pop it back in the fridge for a few minutes.
Shaping and Baking
We’re ready to shape our kourabiedes and pop them in the oven. This step is crucial for getting that perfect texture and look we all love.
Using a Cookie Cutter
We like to use a round cookie cutter for our kourabiedes. It gives them a nice, uniform shape. We take small bits of dough, about 30 grams each, and gently press them into the cutter. If we don’t have a cutter, no worries! We can roll the dough into small balls and flatten them slightly with our palms.
Sometimes, the dough gets a bit warm in our hands. When this happens, we pop it back in the fridge for 15 minutes. It’s much easier to work with when it’s cool.
Baking Tray Preparation
Before we start shaping, we always line our baking trays with parchment paper. It stops the cookies from sticking and makes clean-up a breeze. We space the cookies about 2 cm apart on the tray. They don’t spread much, but we like to give them a bit of room.
We preheat our oven to 180°C. Once it’s hot, we pop the trays in and bake for about 20 minutes. We keep an eye on them – we want them just lightly golden. When they’re done, we let them cool on the tray for a few minutes before moving them.
Finishing Touches

The final steps in making Kourabiedes are crucial for that perfect festive look and taste. We’ll cover how to properly coat these biscuits and some creative garnishing ideas.
The Role of Sugars
We love how a generous dusting of icing sugar transforms our Kourabiedes. It’s not just for looks – it adds a lovely sweetness too. We start by letting our biscuits cool completely. Then, we sift a thick layer of confectioner’s sugar over them. We often do this twice to make sure they’re properly coated. Some of us like to add a touch of vanilla to the sugar for extra flavour.
For a twist, we sometimes use powdered sugar mixed with a bit of rose water or orange blossom water. It gives our Kourabiedes a subtle floral note that’s quite lovely. We’ve found that about 1 teaspoon of flavouring per cup of sugar works well.
Garnishing Varieties
While the classic Kourabiedes are simply coated in sugar, we enjoy trying different garnishes. One of our favourites is pressing a whole almond into the centre of each biscuit before baking. It looks pretty and adds a nice crunch.
We also like sprinkling slivered almonds or finely chopped pistachios on top after the sugar coating. It adds colour and texture. For a festive touch, we sometimes use edible silver or gold leaf. Just a tiny bit on each biscuit makes them look really special.
If we’re feeling fancy, we might drizzle a bit of melted white chocolate over the sugar-coated biscuits. It sets nicely and looks quite posh. Whatever garnish we choose, we always make sure it complements the delicate almond flavour of our Kourabiedes.
Flavour Enhancers

We love adding extra oomph to our kourabiedes with a few special ingredients. These secret weapons take these Greek Christmas biscuits from good to amazing.
Incorporating Liquors
We’re big fans of adding a splash of booze to our kourabiedes. A tablespoon or two of brandy gives them a warm, festive kick. Rum works brilliantly too, lending a rich sweetness. For a truly Greek twist, we sometimes use ouzo – it adds a subtle aniseed note that’s quite lovely. Cognac is another top choice, bringing a touch of luxury.
We usually mix the liquor into the dough, but you could also brush it on after baking for an extra boozy hit. Just remember, a little goes a long way – we don’t want to overpower the delicate almond flavour.
Spicing It Up
Spices are brilliant for adding depth to kourabiedes. We always include a good pinch of ground cinnamon – it’s practically essential in our book. It brings a warm, comforting flavour that screams ‘Christmas’.
Almond extract is another must-have for us. It intensifies the nutty flavour and makes the biscuits even more irresistible. We typically use about half a teaspoon per batch.
For a twist, we sometimes add a smidge of ground cloves or cardamom. They bring a lovely warmth and complexity. Vanilla extract is nice too, rounding out the flavours beautifully.
Customisation and Variations

Greek Kourabiedes are quite flexible. We can tweak the recipe to suit different tastes and dietary needs. Let’s explore some ways to put our own spin on these tasty treats.
Dietary Adaptations
We’ve found that Kourabiedes can be made vegan with a few simple swaps. Instead of butter, we use vegan margarine or coconut oil. For a dairy-free version, we replace cow’s milk with almond or soy milk. Gluten-free flour works well too, making these biscuits safe for those with coeliac disease.
We’ve tried using different sugars like coconut sugar or stevia for a lower glycemic index. The texture might change slightly, but the taste is still lovely. For extra flavour, we sometimes add a dash of orange zest or vanilla extract.
Nut-Free Options
While almonds are traditional, we can make nut-free Kourabiedes. We simply leave out the nuts or replace them with seeds like pumpkin or sunflower. These give a nice crunch without the allergy risk.
For a different twist, we’ve used crushed candy canes instead of nuts. This adds a festive peppermint flavour that’s perfect for Christmas. Another option is to roll the dough in desiccated coconut before baking. This creates a tropical version of the classic Greek butter cookie.
Storing and Serving

We’ve found that proper storage and presentation make all the difference for our beloved Greek Christmas biscuits. Let’s explore how to keep these treats fresh and serve them in style.
Optimal Storage Conditions
We always store our kourabiedes in an airtight container to maintain their delicate texture. A cool, dry spot in the pantry works brilliantly. We’ve learned that these biscuits can last up to two weeks when stored properly. It’s best to layer them between sheets of parchment paper to prevent sticking.
If we’re feeling extra careful, we pop them in the fridge. This can extend their life to about a month. But we must remember to bring them to room temperature before serving. The cold can make them a bit too firm.
For longer storage, we’ve had success freezing kourabiedes. We wrap them tightly in cling film and place them in a freezer bag. They’ve stayed tasty for up to three months this way.
Presentation Tips
We love to make our kourabiedes look as good as they taste. A traditional approach is to dust them generously with icing sugar just before serving. This gives them that classic snowy appearance.
For a festive touch, we arrange them on a pretty platter with sprigs of fresh mint or small pine branches. Sometimes we add a few cinnamon sticks or star anise for a lovely aroma.
If we’re giving them as gifts, we package them in clear cellophane bags tied with red or gold ribbon. A handwritten label adds a personal touch.
For a fancy dessert table, we’ve tried stacking them in a pyramid shape. It’s quite eye-catching! We also like to serve them alongside Greek coffee or hot chocolate for a cosy treat.
Frequently Asked Questions
We’ve gathered some common questions about making Kourabiedes. These tips will help you create perfect Greek Christmas butter cookies at home.
How do I achieve the perfect texture for my homemade Kourabiedes?
For the best texture, we cream the butter until it’s light and fluffy. We mix in the other ingredients gently. It’s key not to overmix the dough. We also chill it before shaping. This helps the cookies keep their shape while baking.
What type of butter is preferred when making traditional Greek butter cookies?
We use unsalted butter at room temperature. It should be good quality and fresh. Some bakers like to use a mix of butter and shortening. This can make the cookies extra crumbly.
Could you suggest the best way to finely chop almonds for Kourabiedes dough?
We like to use a food processor to chop the almonds. Short pulses work best. We stop when the pieces are small but not powdery. For a more rustic cookie, we chop by hand with a sharp knife.
What are the essential ingredients that I need to make authentic Kourabiedes at home?
The must-haves are butter, flour, icing sugar, and almonds. We also use vanilla extract for flavour. Some recipes call for brandy or ouzo. These add a nice twist to the classic taste.
Is there a particular technique to dust the Kourabiedes with icing sugar without making them soggy?
We let the cookies cool completely first. Then we roll them in icing sugar while they’re still warm. Once they’re cool, we dust them again. This double coating gives a nice, dry finish.
Could you explain the proper storage method for Kourabiedes to maintain their freshness?
We store Kourabiedes in an airtight container at room temperature. We place parchment paper between layers to stop them sticking. Kept like this, they can last for weeks.


